前文 突然萌生写一个自动设定单词桌面的脚本的想法。Github上找了个词库,查了下API就完工了。大致的效果如图所示。
正文 这个程序比较简单,第一个问题是词库。百度搜到的基本都是付费文库的……
于是 Google 了一下在 Github 找到了一个不错的。
https://raw.githubusercontent.com/mahavivo/english-wordlists/master/GRE_8000_Words.txt
这个词库包括音标和释义。
接下来是设定壁纸的 Windows API。
1
2
import ctypesctypes.windll.user32.SystemParametersInfoW(20 , 0 , tmp_desktop_path, 0 )
百度了一下就可以找到,将函数的第三个参数换成图片的路径就好。
最后是在图片上贴文字的API,这里我使用的 PIL ,为了居中显示参考了:https://www.cnblogs.com/chenlizhi/p/13073459.html、
然后具体就是根据自己的壁纸调整贴文字的坐标和字体(包括大小)了。
设置坐标的重点在于使用 font.getsize(text) 来获得文字大小的信息。
因为程序真的蛮简单,这里把我的代码直接贴在这里。
1 2 3 4 5 6 7 8 9 10 11 12 13 14 15 16 17 18 19 20 21 22 23 24 25 26 27 28 29 30 31 32 33 34 35 36 37 38 39 40 41 42 43 44 45 46 47 48 49 50 51 52 53 54 55 56 57 58 59 60 61 62 63 64 65 66 67 68 69 70 71 72 73 74 75 76 77 78 79 80 81 82 83 import ctypesimport PILimport randomfrom PIL import ImageFontfrom PIL import Imagefrom PIL import ImageDrawimageFile = "C:\\Users\\Hell05\Pictures\\stars.png" words_path = "F:\\Python_Project\\Python_word_wallpaper\\GRE_8000_Words.txt" English_font_path = "C:\\Windows\\Fonts\\times.ttf" phonetic_font_path = "C:\\Windows\\Fonts\\times.ttf" translation_font_path = "C:\\Windows\\Fonts\\STKAITI.TTF" tmp_desktop_path = "C:\\Users\\Hell05\Pictures\\tmp_stars.png" English_font_color = (255 , 255 , 255 ) phonetic_font_color = (255 , 255 , 255 ) translation_font_color = (255 , 255 , 255 ) word_center_x = 945 English_font_size = 96 phonetic_font_size = 64 translation_font_size = 48 image = Image.open (imageFile) words_fp = open (words_path,"r" , encoding='UTF-8' ) words_lines = words_fp.readlines() words_count = len (words_lines) word_index = random.randint(0 , words_count-1 ) word_line = words_lines[word_index].split(" " , 2 ) word_line[2 ] = word_line[2 ].rstrip() print (word_line)draw = ImageDraw.Draw(image) English_font = ImageFont.truetype(English_font_path, English_font_size) English_text_width = English_font.getsize(word_line[0 ]) draw.text((word_center_x - English_text_width[0 ]/2 , 200 - English_text_width[1 ]/2 ), word_line[0 ], English_font_color, font=English_font) phonetic_font = ImageFont.truetype(phonetic_font_path, phonetic_font_size) phonetic_text_width = phonetic_font.getsize(word_line[1 ]) draw.text((word_center_x - phonetic_text_width[0 ]/2 , 220 + English_text_width[1 ]/2 ), word_line[1 ], phonetic_font_color, font=phonetic_font) translation_font = ImageFont.truetype(translation_font_path, translation_font_size) translation_text_width = translation_font.getsize(word_line[2 ]) draw.text((word_center_x - translation_text_width[0 ]/2 , 240 + English_text_width[1 ]/2 + phonetic_text_width[1 ]), word_line[2 ], translation_font_color, font=translation_font) image.save(tmp_desktop_path) ctypes.windll.user32.SystemParametersInfoW(20 , 0 , tmp_desktop_path, 0 ) print ('Finished.\n与君共勉。\nBy Haulyn5.' )
设定好参数后,每次运行脚本就会发现桌面上贴上了单词。
接下来你可能想每次开机或者每一段时间都切换单词。这里参考了:https://www.cnblogs.com/jjliu/p/11505720.html,具体流程如下。
在“此电脑”上右键点击,选择“更多”-‘管理’,点击进入“计算机管理”界面。
接下来,点击“系统管理”-“任务计划程序”,然后最右侧选择“创建基本任务”
按照向导设定就好,这里你会发现根本没有地方设定每一段时间执行。没有关系,这个之后可以在外面修改,随便设定就可以了。
在设定“操作”时,记得找到脚本的路径,让任务执行脚本。注意这里将脚本的后缀名改成 pyw 而不是 py,这样可以避免每次执行任务时弹出小黑窗影响工作。
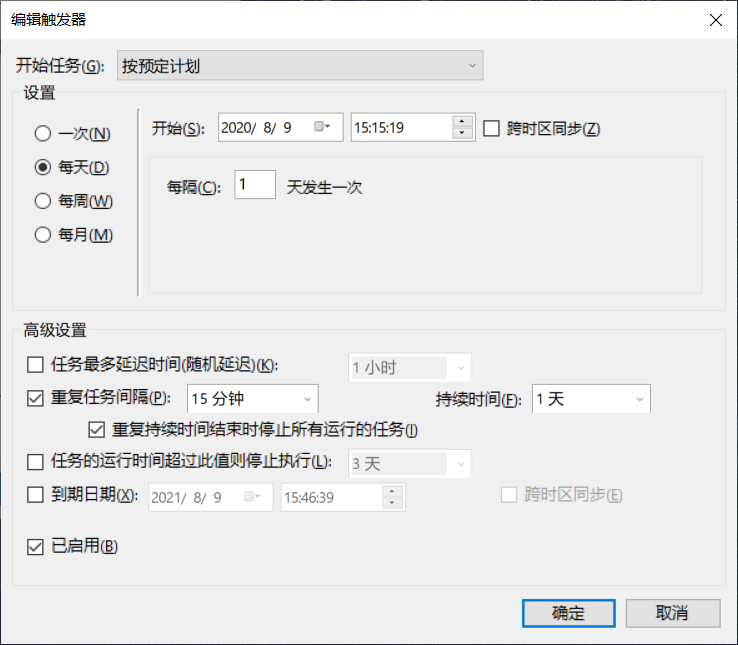
打开你新建的任务计划的属性,这里可以设定多个触发器,并对触发器做更多设定。因为比较易懂,这里不做介绍。
下面给出我的触发器设定仅供参考。该触发器保证脚本每15分钟执行一次。
至此配置结束,每当执行脚本时你都会看到你的桌面刷新了新单词。
对脚本有何改进意见欢迎提出建议。与诸君共勉。